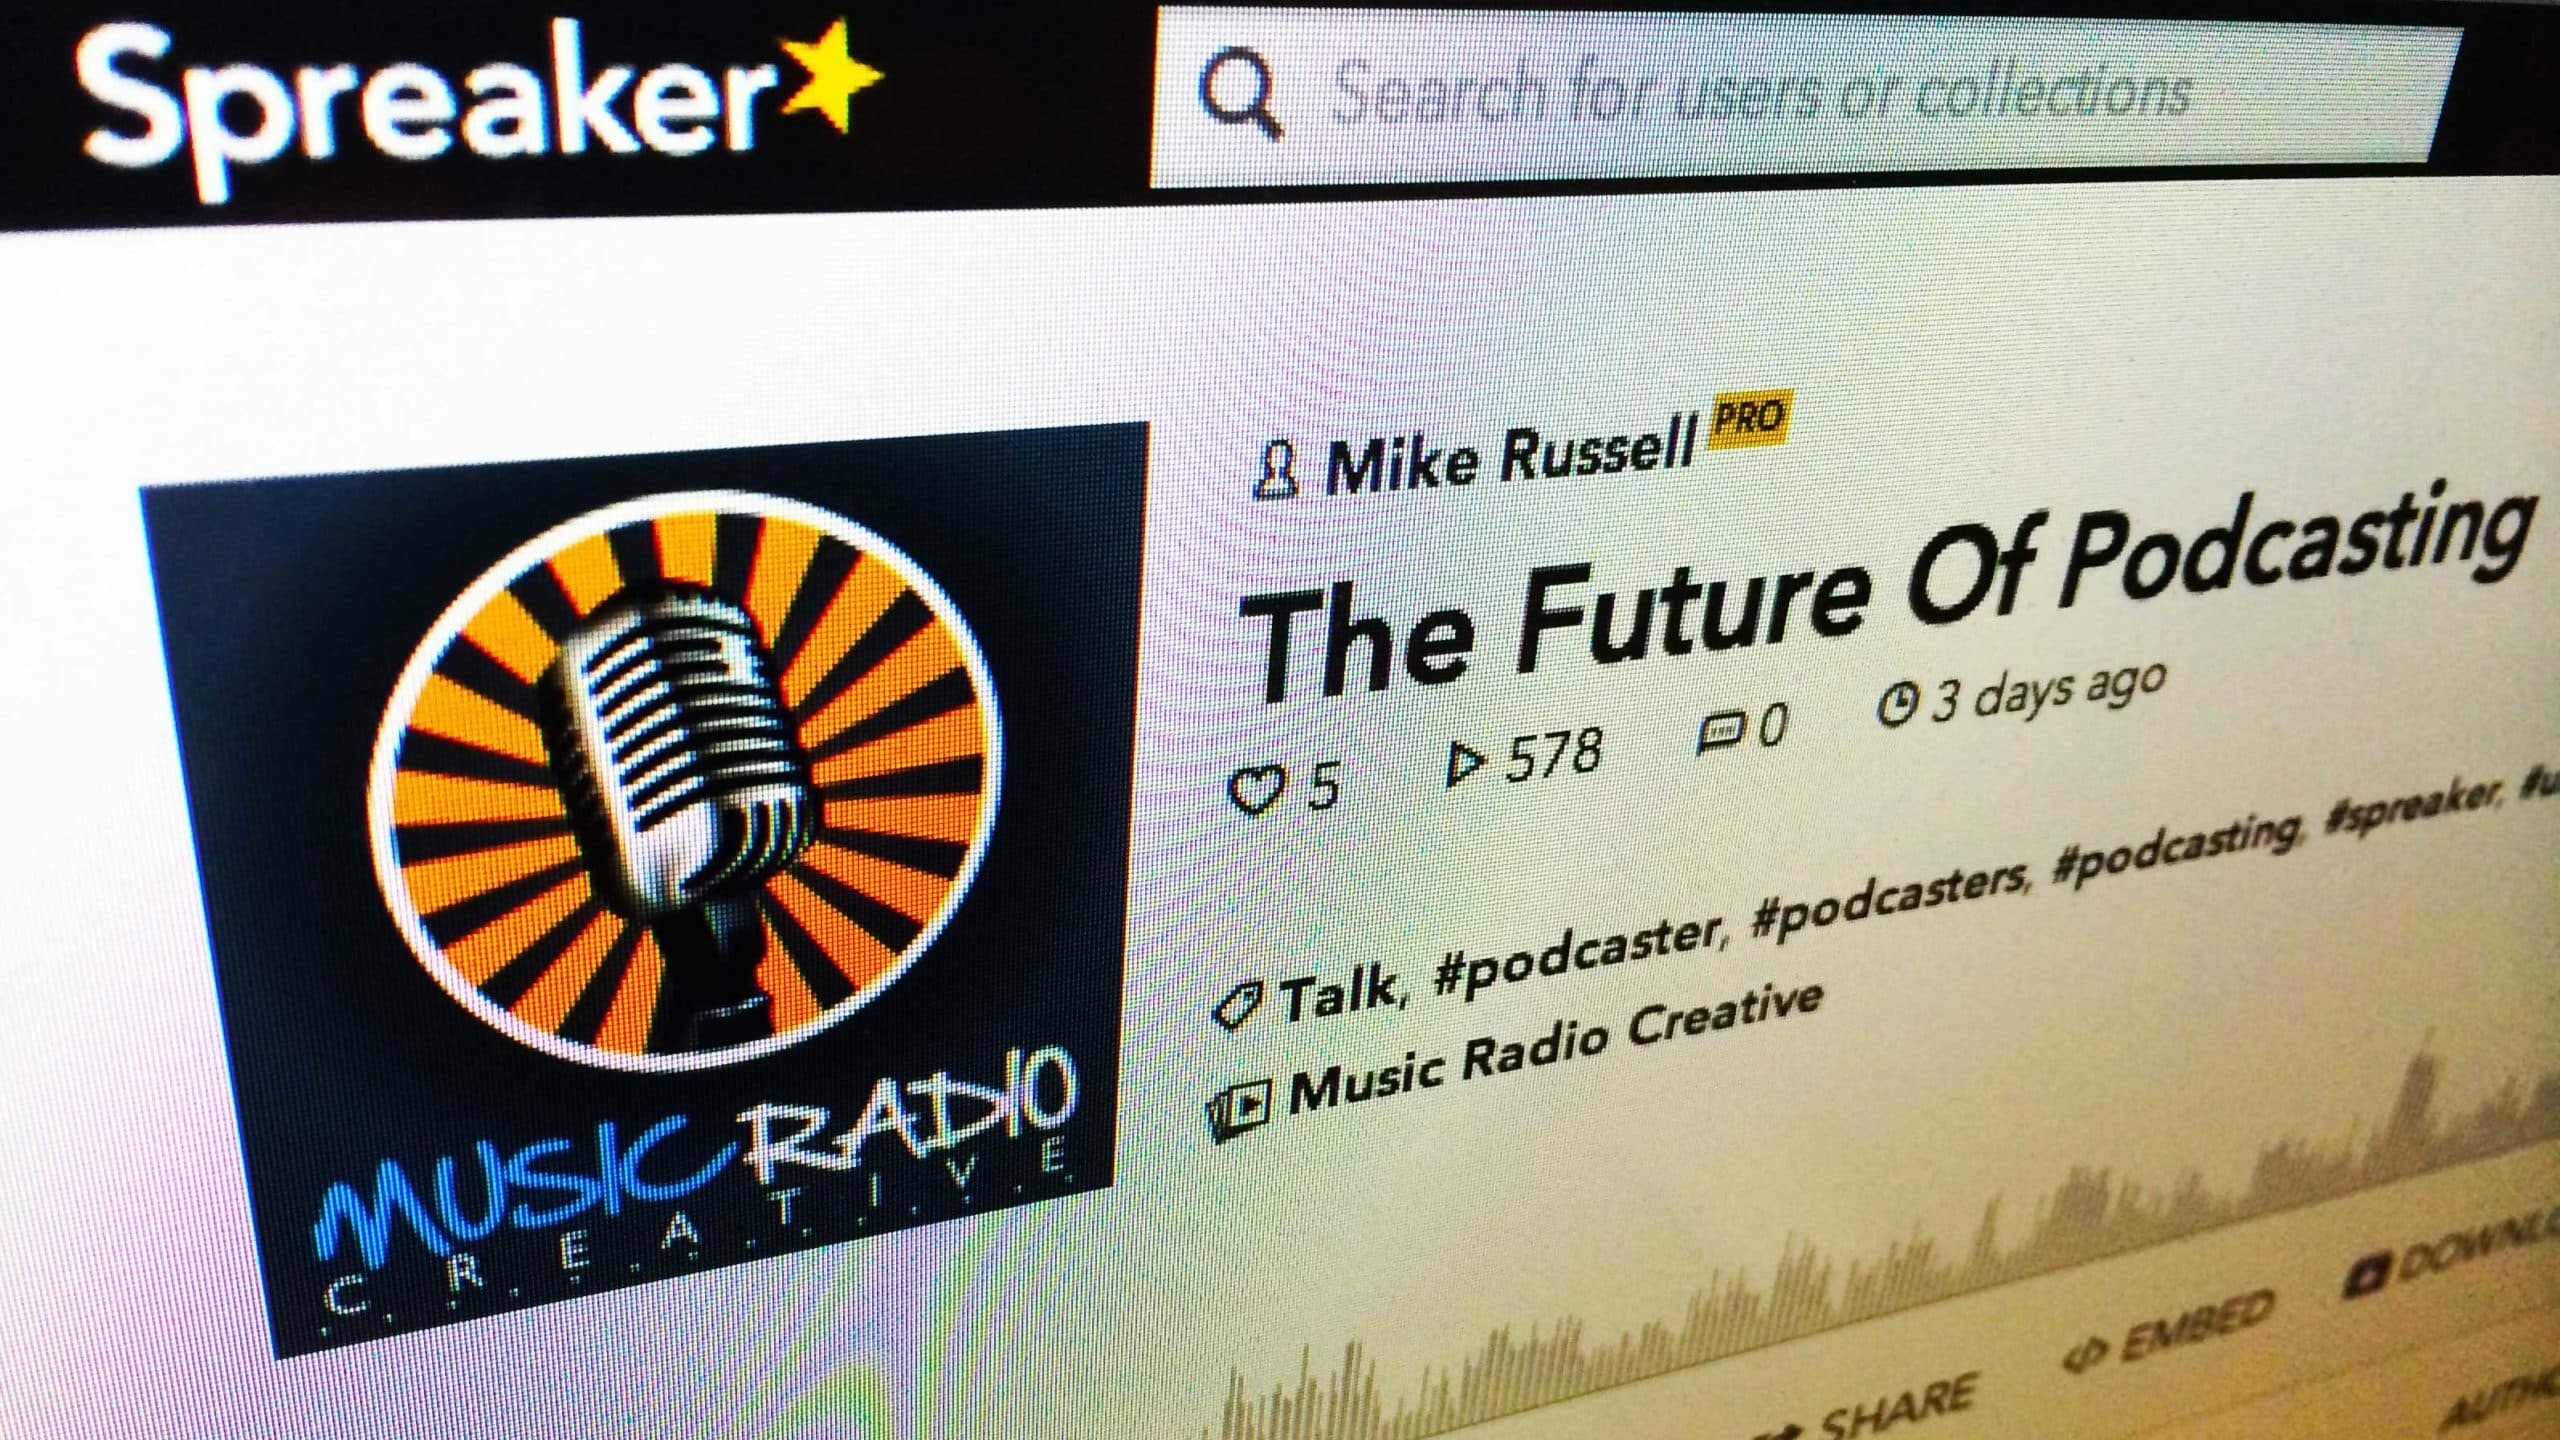
I often get asked the question, “can I use Spreaker to host a podcast”? The answer is absolutely, yes! It’s a super and easy to use platform for podcasting.
There has been much discussion and debate as to what Spreaker can and can’t do in the podcasting community. Read on for my ultimate guide to how I use Spreaker to publish our weekly Music Radio Creative Podcast and how you can do it too!
You will need:
- A free Spreaker account.
- A self-hosted WordPress site.
- The Blubrry PowerPress Podcasting plugin for WordPress.
First, here are the answers to some common questions I hear about Spreaker for podcasting:
Can I Use Spreaker As A Podcast Media File Host?
Yes, you can, it’s simply a case of uploading your completed audio file using Spreaker’s easy upload option. When you hit publish on the episode you’ll get a download link to a physical mp3 file which you can share or syndicate anywhere via RSS.
Can I Keep Control Of My RSS Feed?
Yes, absolutely! The key to keeping control is to never use an RSS feed from a third party. I have the words of podcast coach Dave Jackson echoing through my head, “always submit an RSS feed that YOU control to iTunes, Stitcher and other podcast directories”. Spreaker does offer an RSS feed option but I would always opt to create my own. This is especially important if you apply to get listed on iHeartRadio Talk via Spreaker and are accepted your Spreaker RSS feed will disappear. I’ll show you how you can host with Spreaker, be on iHeartRadio and keep control of your RSS feed in this guide.
How I Upload & Publish A Weekly Podcast On Spreaker
1. Save Your Finished Podcast Episode
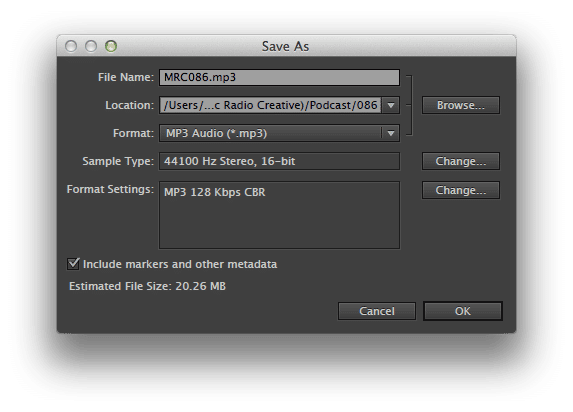
When saving your audio file it is important to make sure you save it as a .mp3 file with the sample type 44100 Hz Stereo, 16-bit and the format settings should be MP3 128 Kbps CBR. Spreaker re-encodes files of any other format but will not re-encode a file saved with these exact settings. If your file is re-encoded it can have an underwatery sound and a slight loss of audio quality so make sure you get these settings correct.
2. Upload Your Podcast To Spreaker
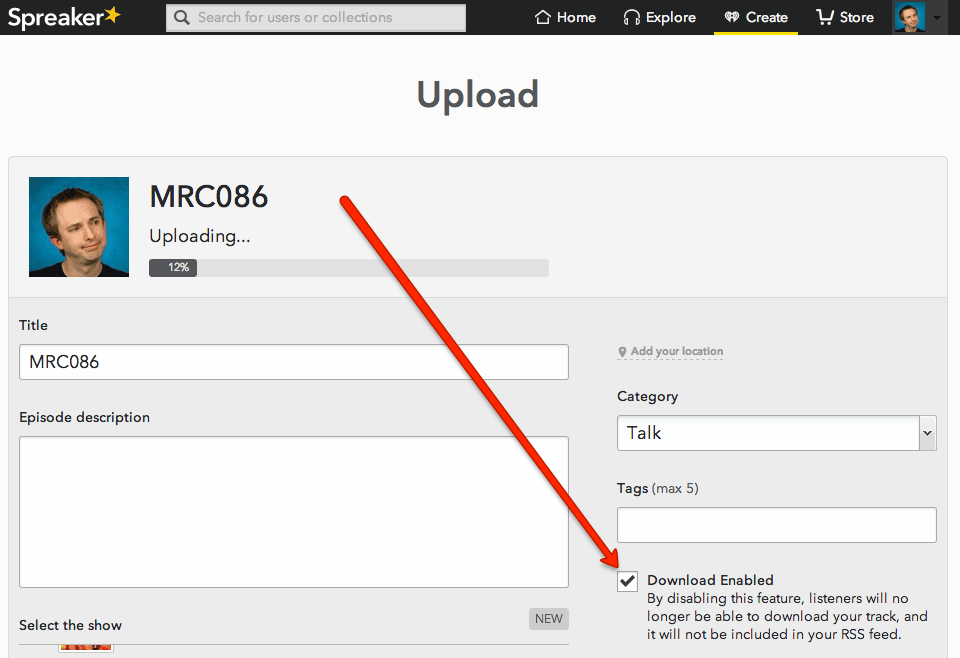
It’s easy to upload your mp3 file using Spreaker. Make sure you’re logged in to your account, click “Create” then click “Upload” and select the mp3 file you just saved. Next add all the meta information to your podcast and make sure “Download Enabled” is ticked. When the upload is complete you can hit “Publish”.
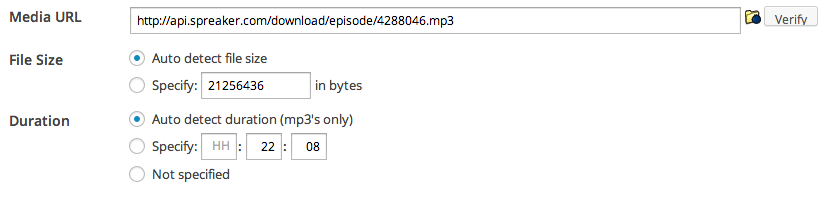
3. Get The mp3 Download Link
Go to the URL for your latest episode on Spreaker and right click the download link. Click “Copy Link Address” in the Chrome web browser or equivalent in your own web browser.

4. Paste The Link Into PowerPress & Publish!
Paste the link to your mp3 file into the “Media URL” section of PowerPress and hit “Verify”. Once you get confirmation of your audio file’s existence you’re ready to go! Type out those show notes and hit “Publish” on WordPress and your show will go live to an RSS feed that you control.
In the case of the Music Radio Creative Podcast that feed is: https://producer.musicradiocreative.com/feed/podcast
Can I See My Podcast Download Stats?
Yes, Spreaker has basic and advanced level (paid) stats for your podcast. I would also highly recommend signing up to Blubrry’s free or paid podcast stats service (which you can activate and use together with Spreaker in PowerPress once registered). This will give you access to a little more information such as geographic locations and the chance to be included in Blubrry’s podcast sponsorship deals.
Ready To Try Spreaker Yourself?
Get started with Spreaker for free and you have the option to upgrade if and when you need more storage or advanced statistics. I do not get a commission when you sign up and use Spreaker I simply use and love their service and wanted to make it easy for other podcasters to do the same.
With Spreaker you’ll get the added benefits of applying to be included in iHeartRadio Talk (an app with many millions of potential listeners) and you’ll be on their own internal socially shareable platform which has around 3,000,000 users at the time of writing this guide.


Still one of my Favorite How-To’s!
Thanks so much JC. I enjoyed creating this too 🙂
Thanks Mike! This opens up a new Dimension of podcasting for me and gives me more clarity on what I want or can do. Great job, keep up the good work! PS. it was a real pleasure to meeting you in Berlin for the podcasting meetup last Friday!
Thanks, great to meet you too and I hope this guide will be handy for you!
Thanks for the very clear explanation – and alerts such as the specific encoding details to avoid the re-encoding trap. I’m attracted to using Spreaker for hosting and this has been very helpful.
Thanks so much Des. Great to hear you’ve found this guide handy!
thanks for this guide Mike! Just setting up a new podcast (www.thursdaytechtip.com) on spreaker now, this was v handy!
Great to hear you found the guide handy Jonathan! 🙂
My laptop just broke, so I only have my 3rd gen iPad to create my podcast, wich is publish via Tumblr, feed managed by Feedburner, and currently hosted at Archive.org.
After reading this tutorial, I guess I can modify my entire process (to run it from the iPad) as follows:
– Subscribe to the basic Spreaker plan via the Studio app, using iTunes credits.
– Record my podcast on BossJock Studio app.
– Export the MP3 (properly encoded and tagged) to the Spreaker Studio app.
– Look for that mo3 at the “drafts” section and upload it to the Spreaker hosting.
– Go to the Spreaker account on the Safari browser and copy the “download” link for the episode.
– Open my Tumblr account on another tab and paste that link on the “publish an audio” option. Fill the show notes, and publish.
As I see it, this way I won’t have to change nothing in my feed (via Feedburner) so iTunes, Stitcher and TuneIn can keep track of my new posts.
Am I right o wrong? Did I miss something? How would you do it in my place?
Thanks for your answers.
Greetings from Mexico.
Hola Enrique!
This seems like a solid workflow to me and, as you show, it is possible to use Spreaker as a host and publish on your platform of choice 🙂
Thank you for your answer.
I’ve already hired the Spreaker’s On-Air Talent plan 15 days ago. I’m happy with the service so far. Maybe I’ll upgrade it as soon as I get some monetization.
By the way, it’s been a real adventure to make it all work from my iPad 3rd generation.
Greetings from Mexico.
Hi Mike
Thanks for the post, very helpful.
The audio file settings you describe are set up in Adobe Audition, I don’t use Adobe Audition, I edit my videos and audios on Screenflow and then only sometimes put the files through Auphonic to clean up the sound. I just get given an mp3 file and without using Adobe am not sure how we can choose ‘44100 Hz Stereo, 16-bit and the format settings should be MP3 128 Kbps CBR’ like you specify.
Is it the end of the world if we just let Spreaker reencode our files, how bad is the loss of quality?
Thanks so much in advance.
All the best
Duncan
I’d always prefer my uploaded files not to be re-encoded as the sound can be poor, especially on speech, you will get an ‘underwater’ sound. If you’ve already re-encoded audio or used clips in your podcast these could be degraded even further.
I really appreciate your reply. I just don’t know what to do if Abode Audition isn’t part of our work flow. I have over 50 video episodes live on my blog all already converted with AAC Audio Sample rate 44.1 kHz, Datarate 256 kbits/sec and H.264 Video with a Framerate 30 fps, Datarate 1200 kbits/sec.
My plan was to launch an MP3 audio version of my interviews onto iTunes so I was just going to upload the MP3 files onto Spreaker, but I’m concerned now all of my audio will be dodgy quality if Spreaker reencode everything. Maybe I should just go with Libsyn instead?
Thanks so much in advance.